
초기 가설:
다음 라이브러리 (패키지)를 통해서 메일링 기능 구현
GitHub - sofn-xyz/mailing: Build, test, send emails with React
사용법:
yarn:
yarn add mailing-core mjml mjml-react nodemailer &&\\
yarn add --dev mailing @types/mjml @types/mjml-react @types/nodemailer
또는 npm:
npm install --save mailing-core mjml mjml-react nodemailer &&\\
npm install --save-dev mailing @types/mjml @types/mjml-react @types/nodemailer
npx mailing 명령을 실행하고 테스트용 이메일을 입력하면, 이메일 템플릿 프리뷰 창(포트 3883)이 열리면서 emails 디렉토리가 생성된다. 구조는 다음과 같다.
emails
├── TextEmail.tsx // a simple example email template
├── Welcome.tsx // a complicated example email template
├── components // shared components go in here
│   ├── BulletedList.tsx
│   ├── Footer.tsx
│   ├── Head.tsx
│   ├── Header.tsx
│   └── theme.ts
├── index.ts // this exports sendMail and is where your SMTP config goes
└── previews // use previews to develop and check templates
    ├── TextEmail.tsx
    └── Welcome.tsx
모바일에서 확인했을 때의 모습과, HTML 파일로 변경된 tsx 템플릿들의 코드를 볼 수도 있다.
호스트, 포트, SMTP 아이디와 비밀번호 등이 담긴 defaultFrom 변수를 emails/index.ts 파일에 만든다.
예시:
const transport = nodemailer.createTransport({
  host: "smtp.sendgrid.net",
  port: 587,
  auth: {
    user: "apikey",
    pass: process.env.SEND_GRID_KEY,
  },
});
마지막으로 index.ts 에 만들어진 sendMail 함수를 이렇게 사용하면 된다.
import { sendMail } from "emails";
import Welcome from "emails/Welcome";

sendMail({
  subject: "My First Email",
  to: "tester@example.com",
  cc: "tester+cc@example.com",
  bcc: ["tester+bcc@example.com", "tester+bcc2@example.com"],
  component: <Welcome name="Amelita" />,
});
트러블슈팅
계속해서 같은 오류에 부딪혔다. sendMail 코드를 이메일 입력 폼에서 바로 사용하면서 계속 오류가 나타났는데, 처음에는 npx mailing init을 잘못된 위치에서 했거나, 혹은 강제로 파일을 옮겨서 벌어지는 일이라고 생각했고, 디버깅을 하면서 레드우드의 프로젝트 구조 상 node_modules가 다수 존재하기 때문에 발생하는 일이라는 것 까지는 이해했다.
한참 시간을 들이다가, 발생하는 에러로그들이 대부분 node.js의 기본적인 내장 패키지들이라는 것을 알아챘고, 지금 작성하는 코드가 당연히 백엔드 쪽에 쓰여져야 할 코드인데 화면 단에서 사용하고 있었다는 것을 깨달았다. 최근에 플러터 앱개발을 계속해서 그런지 이런 당연한 상식이… 헷갈렸다
디버깅하면서 계속 사용해보니, 이 메일링이라는 패키지는 nodemailer라는 패키지에 템플릿을 더했다-라고 할 수 있었다. 템플릿은 기존에 AWS SES를 통해 제작해놓은 것도 있고, 또 필요하면 다시 만들면 될 것 같아 해당 패키지 대신 내부의 nodemailer를 사용하기로 했다. 순서는 다음과 같다.
yarn workspace api add nodemailer
api/db/schema.prisma
datasource db {
  provider = "sqlite"
  url      = env("DATABASE_URL")
}

generator client {
  provider      = "prisma-client-js"
  binaryTargets = "native"
}

// The app we're building is going to have two models.
// One for our users and one for the audit logs.
// Paste the following two models in your schema file.
// reference <https://redwoodjs.com/docs/how-to/sending-emails>

model Audit {
  id        String   @id @default(uuid())
  createdAt DateTime @default(now())
  updatedAt DateTime @default(now()) @updatedAt
  userId    String
  user      User     @relation(fields: [userId], references: [id])
  log       String
}

model User {
  id        String   @id @default(uuid())
  createdAt DateTime @default(now())
  updatedAt DateTime @default(now()) @updatedAt
  email     String   @unique
  name      String?
  audits    Audit[]
}
yarn rw prisma migrate dev --name email
yarn rw g scaffold User

yarn rw g scaffold Audit
yarn rw dev
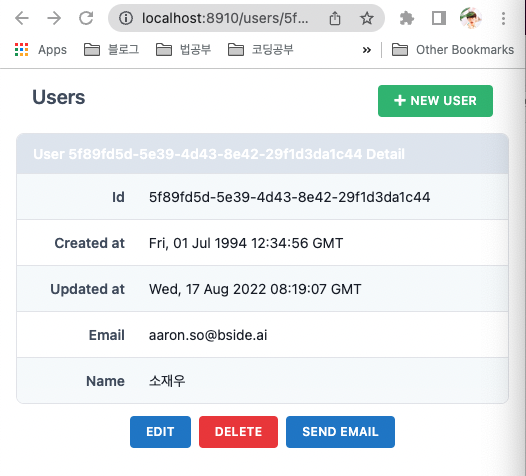
나타난 홈페이지 화면에서 하위 URL /users 로 접속하면 단순한 형태의 사용자 리스트를 볼 수 있다. (또는 yarn rw prisma studio를 입력해 프리즈마 스튜디오에서 확인 혹은 추가를 해도 좋다.) 사용자가 없다면 https://www.fakenamegenerator.com 같은 곳에서 임의 유저를 생성하면 좋다. NEW USER 버튼을 클릭하거나 프리즈마 스튜디오에서 추가하면 된다.
유저 한 명을 클릭하면 EDIT DELETE 두가지 버튼이 나타난다. 하나의 버튼(이메일 보내기)을 만들어주자.
web/src/components/User/User/User.tsx
import { useMutation } from '@redwoodjs/web'
import { toast } from '@redwoodjs/web/toast'
import { Link, routes, navigate } from '@redwoodjs/router'
const DELETE_USER_MUTATION = gql`
mutation DeleteUserMutation($id: String!) {
deleteUser(id: $id) {
id
}
}
`
const EMAIL_USER_MUTATION = gql`
mutation EmailUserMutation($id: String!) {
emailUser(id: $id) {
id
}
}
`
const timeTag = (datetime) => {
return (
<time dateTime={datetime} title={datetime}>
{new Date(datetime).toUTCString()}
</time>
)
}
const User = ({ user }) => {
const [deleteUser] = useMutation(DELETE_USER_MUTATION, {
onCompleted: () => {
toast.success('User deleted')
navigate(routes.users())
},
onError: (error) => {
toast.error(error.message)
},
})
const [emailUser] = useMutation(EMAIL_USER_MUTATION, {
onCompleted: () => {
toast.success('Email sent')
},
onError: (error) => {
toast.error(error.message)
},
})
const onDeleteClick = (id) => {
if (confirm('Are you sure you want to delete user ' + id + '?')) {
deleteUser({ variables: { id } })
}
}
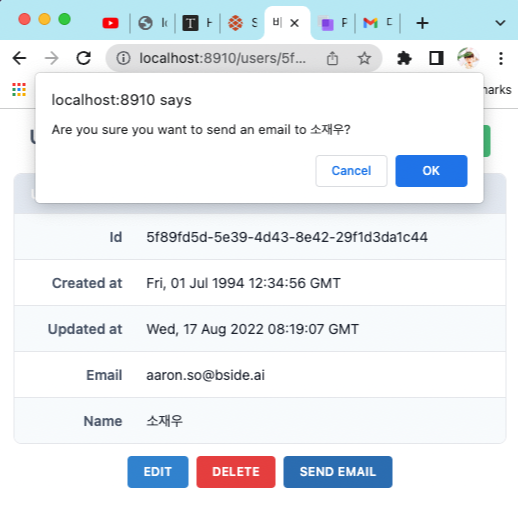
const onEmailClick = (user) => {
if (confirm(`Are you sure you want to send an email to ${user.name}?`)) {
emailUser({ variables: { id: user.id } })
}
}
return (
<>
<div className="rw-segment">
<header className="rw-segment-header">
<h2 className="rw-heading rw-heading-secondary">
User {user.id} Detail
</h2>
</header>
<table className="rw-table">
<tbody>
<tr>
<th>Id</th>
<td>{user.id}</td>
</tr>
<tr>
<th>Created at</th>
<td>{timeTag(user.createdAt)}</td>
</tr>
<tr>
<th>Updated at</th>
<td>{timeTag(user.updatedAt)}</td>
</tr>
<tr>
<th>Email</th>
<td>{user.email}</td>
</tr>
<tr>
<th>Name</th>
<td>{user.name}</td>
</tr>
</tbody>
</table>
</div>
<nav className="rw-button-group">
<Link
to={routes.editUser({ id: user.id })}
className="rw-button rw-button-blue"
>
Edit
</Link>
<button
type="button"
className="rw-button rw-button-red"
onClick={() => onDeleteClick(user.id)}
>
Delete
</button>
<button
type="button"
className="rw-button rw-button-blue"
onClick={() => onEmailClick(user)}
>
Send email
</button>
</nav>
</>
)
}
export default User
해당 버튼을 누르면 동작할 GraphQL 뮤테이션도 만들어주자.
api/src/graphql/users.sdl.ts
emailUser(id: String!): User! @requireAuth
그에 상응하는 실제 함수도 대강 구현한다.
api/src/services/users/users.ts
export const emailUser = async ({ id }: Prisma.UserWhereUniqueInput) => {
const user = await db.user.findUnique({
where: { id },
})
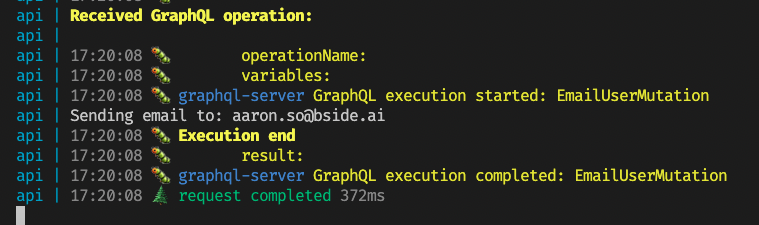
console.log('Sending email to', user)
return user
}
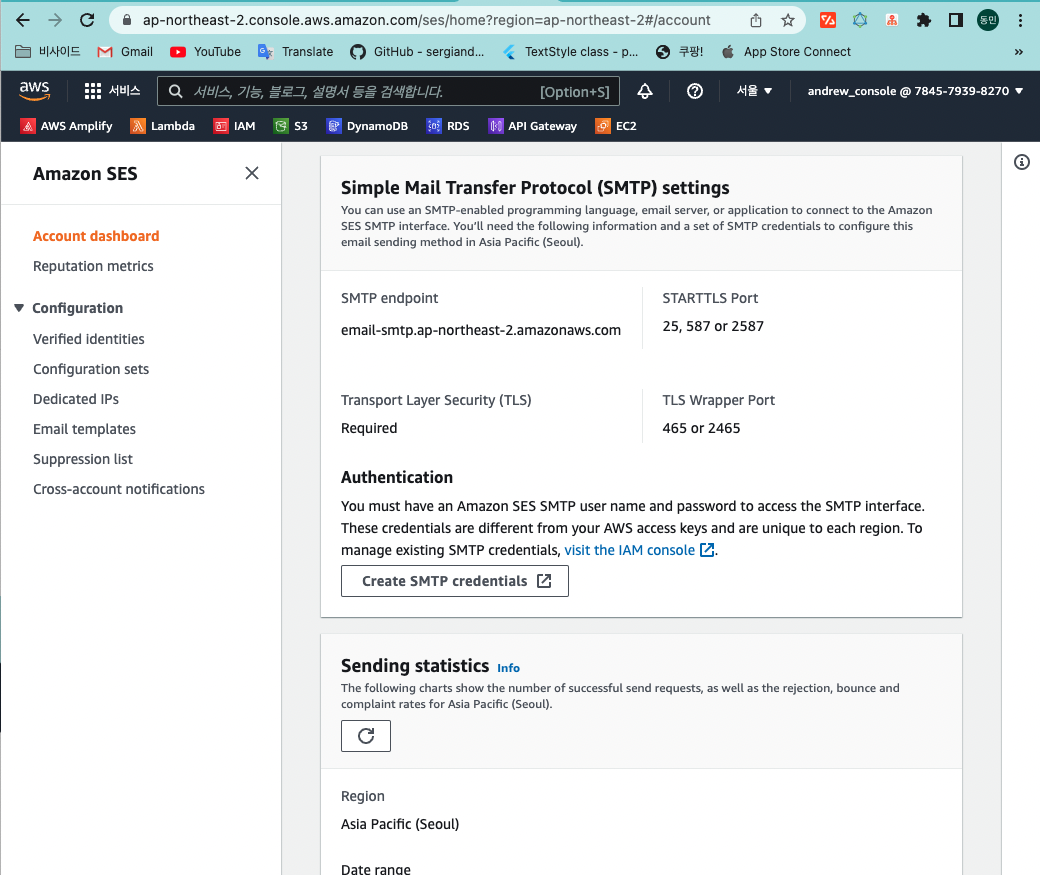
이제 실제로 SMTP 서버를 통해 메일을 보내야 한다. 여기에는 AWS 뿐만 아니라 선택지가 꽤 있다. 크레딧을 가지고 있어 AWS로 구현한다. 방법은 거의 대부분 동일할 것으로 보인다. 특별히 뭔가 새로운 패키지를 설치할 것도 없고 그냥 입력값만 바꿔주면 된다.
아마존 SES 콘솔에 접속해, 화면 속 [ Create SMTP credentials ] 버튼을 눌러 접속한다. (참고로 템플릿을 열어보거나 새로 만들기, 아니면 직접 메일을 전송해보기 등의 동작은 CLI 환경에서만 해볼 수 있으니 유의한다.
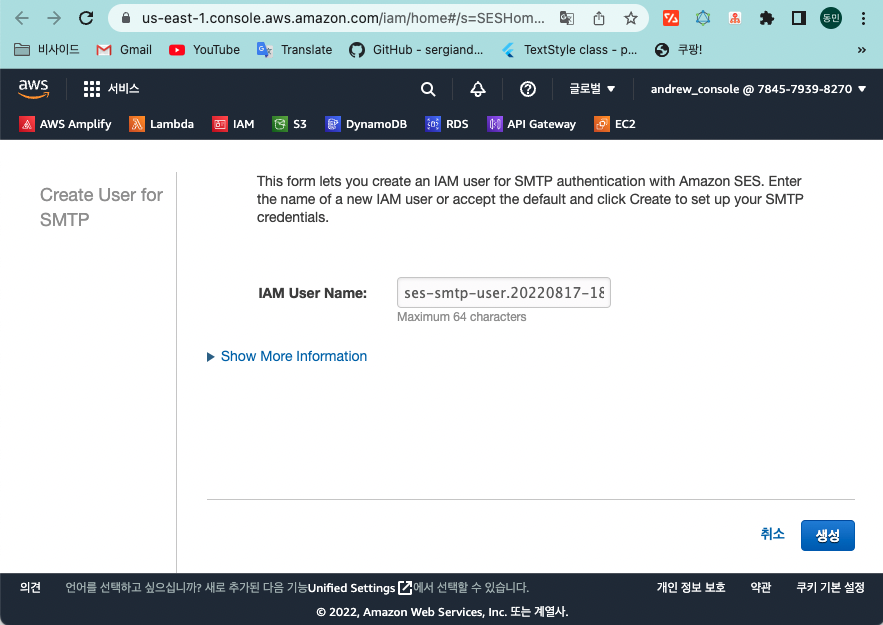
다음 화면이 나타나면 생성 버튼을 클릭한다. 그 다음 **사용자 SMTP 보안 자격 증명 표시(Show User SMTP Security Credentials)**를 확장한다. SMTP 자격 증명이 화면에 표시된다. 대화 상자를 닫은 후에는 자격 증명을 보거나 저장할 수 없으므로 **자격 증명 다운로드(Download Credentials)**를 선택하여 이러한 자격 증명을 다운로드하거나 복사하여 안전한 장소에 저장하세요. CSV 파일로 저장할 수 있다.
SMTP 아이디와 비밀번호, 더 안전하게 하고 싶다면 호스트와 포트번호까지 .env파일에 담고, process.env.로 불러와 사용한다.
api/src/lib/email.ts
import { createTransport } from 'nodemailer'

interface Options {
  to: string | string[]
  subject: string
  text: string
  html: string
}

export async function sendEmail({ to, subject, text, html }: Options) {
  console.log('Sending email to:', to)

  const options = {
    host: process.env.AWS_SES_SMTP_HOSTNAME, // 쉽게 예상 가능한 주소지만 함께 관리한다.
		port: Number(process.env.AWS_SES_SMTP_PORTCODE), // 보통 587이나 2587이다.
    secure: false, // true for 465, false for other ports
    auth: {
      user: process.env.AWS_SES_SMTP_USERNAME,
      pass: process.env.AWS_SES_SMTP_PASSWORD,
    },
  }

  // create reusable transporter object using SendInBlue for SMTP
  const transporter = createTransport(options)

  // send mail with defined transport object
  const info = await transporter.sendMail({
    from: '"비사이드" <info@bside.ai>',
    to: Array.isArray(to) ? to : [to], // list of receivers
    subject, // Subject line
    text, // plain text body
    html, // html body
  })

  return info
}
위에서 대강 구현한 함수를 다음과 같이 변경한다.
api/src/services/users/users.ts
import { sendEmail } from 'src/lib/email'
export const emailUser = async ({ id }: Prisma.UserWhereUniqueInput) => {
const user = await db.user.findUnique({
where: { id },
})
await sendTestEmail(user.email)
return user
}
function sendTestEmail(emailAddress: string) {
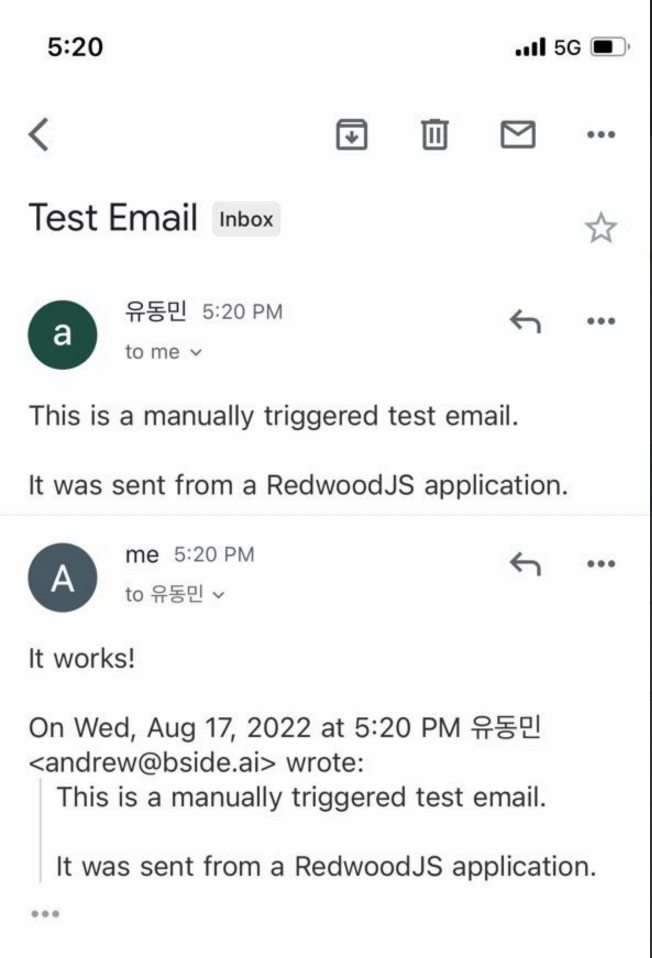
const subject = 'Test Email'
const text =
'This is a manually triggered test email.\\n\\n' +
'It was sent from a RedwoodJS application.'
const html =
'This is a manually triggered test email.<br><br>' +
'It was sent from a RedwoodJS application.'
return sendEmail({ to: emailAddress, subject, text, html })
}
이제 SEND EMAIL 버튼을 누르면 해당하는 유저의 이메일에 위에 작성한 메일이 그대로 보내진다. 끝!!!
'React' 카테고리의 다른 글
| 리액트 네이티브 애플리케이션의 최적화 :: The Ultimate RN Guide (0) | 2023.03.22 |
|---|---|
| Flipper와 Hermes:: 리액트 네이티브 개발자의 성능 최적화 (0) | 2023.03.21 |
| 스파르타코딩클럽 리액트심화반 05주차 꼬리스타그램🐈 (0) | 2021.08.02 |
| 스파르타코딩클럽 리액트심화반 04주차 후기! (6) | 2021.07.30 |
| 스파르타코딩클럽 리액트 심화반 3주차 후기 (0) | 2021.07.21 |


댓글